How to Install Magento 2.4.3 + elasticsearch Using Docker in Linode – Centos 8
- Step : 1 – Installing the PHP 7.4 and PHP Extenisons
- Step : 2 – Installing the Global Composer
- Step : 3 – Installing the docker Community Edition
- Step : 4 – Create a magento project using the composer
- Step : 5 – Installing the docker-compose
- Step : 6 – Setting up the docker-compose.yml
- Step : 7 – Running the docker build
- Step : 8 – Magento Installation Setup using the Command line
Step : 1 – Installing the PHP 7.4 and PHP Extensions
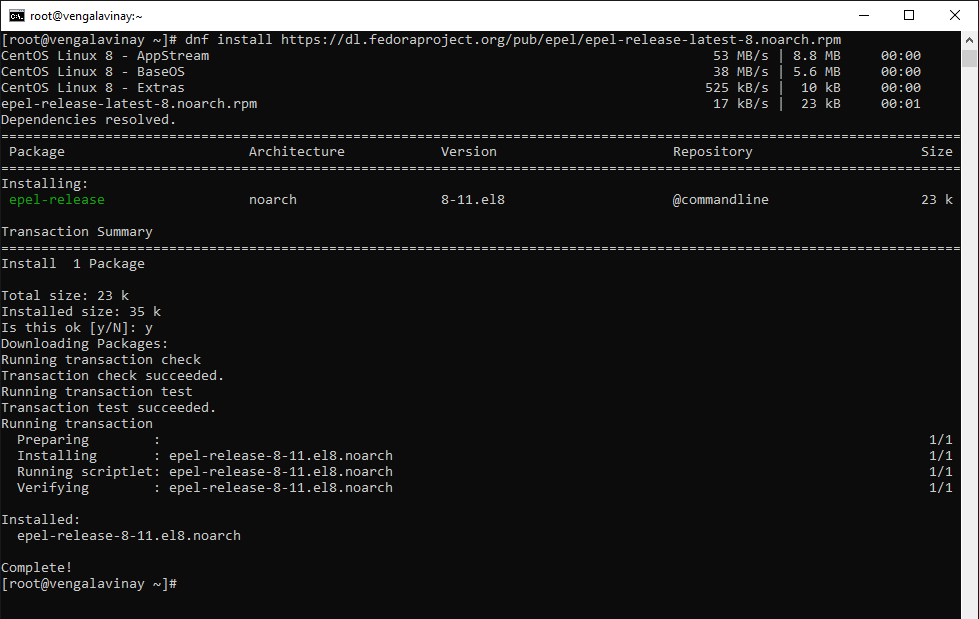
To install and enable the EPEL Repository on CentOS 8, Execute the following dnf command
dnf install https://dl.fedoraproject.org/pub/epel/epel-release-latest-8.noarch.rpm
To confirm the presence of the EPEL Repository, run the following rpm command
rpm -qa | grep epel

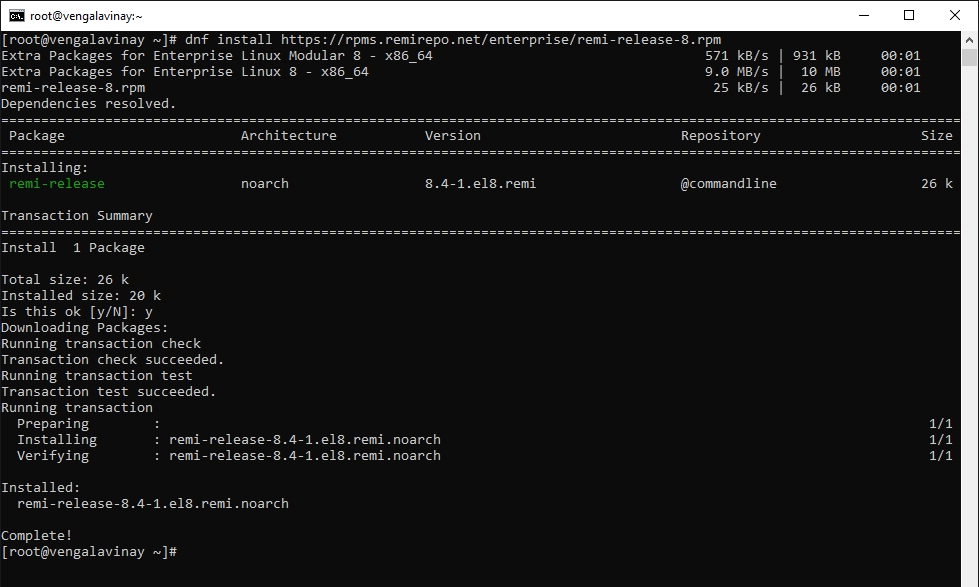
Next, run the command below to add the REMI Repository
dnf install https://rpms.remirepo.net/enterprise/remi-release-8.rpm
To verify the existence of the REMI repository, run the command
rpm -qa | grep remi

Execute the below to get a list of available PHP module streams.
dnf module list php
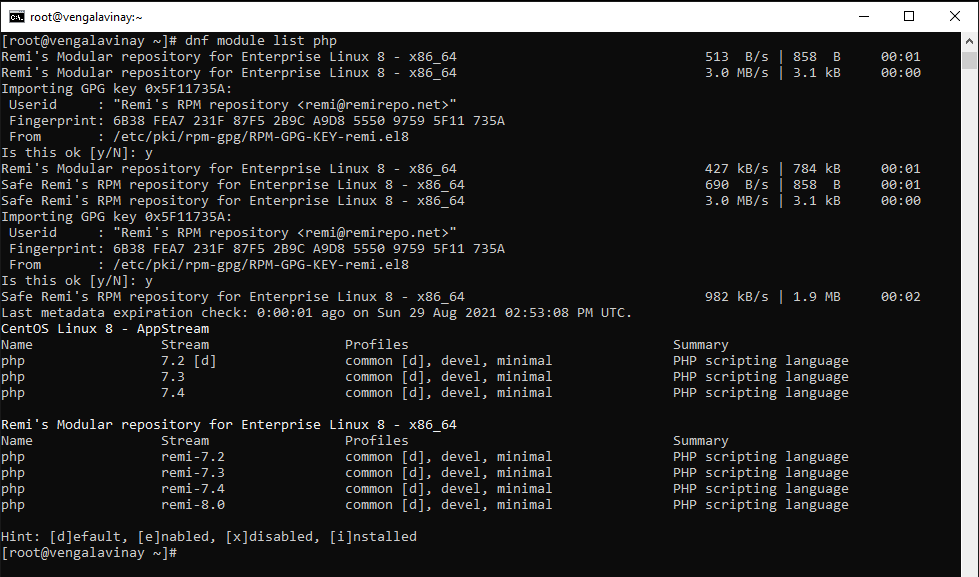
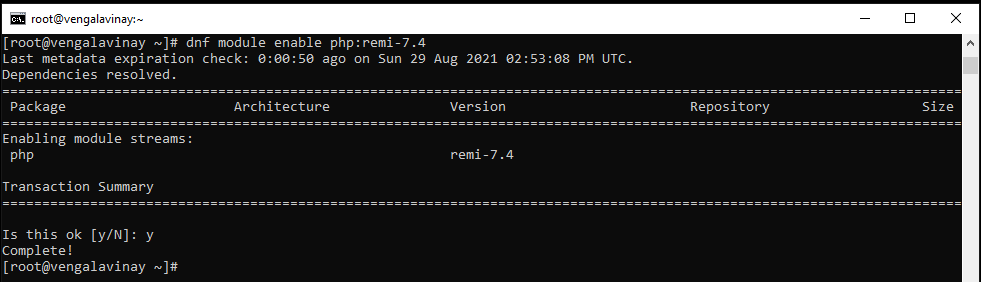
From the output above, now we are using the remi-7.4 as per our requirement. we are going to enable the module stream as shown below.
dnf module enable php:remi-7.4
Install the PHP and dependency extensions using the command below.
dnf install php php-cli php-common php-json php-gd php-sockets php-soap php-intl php-zip php-pdo_mysql

To check the version of PHP installed, run the command
php -v

Step : 2 – Installing the Global Composer
Download the composer installer script with:
php -r "copy('https://getcomposer.org/installer', 'composer-setup.php');"

Run the following command to install composer in the /usr/local/bin directory:
sudo php composer-setup.php --install-dir=/usr/local/bin --filename=composer
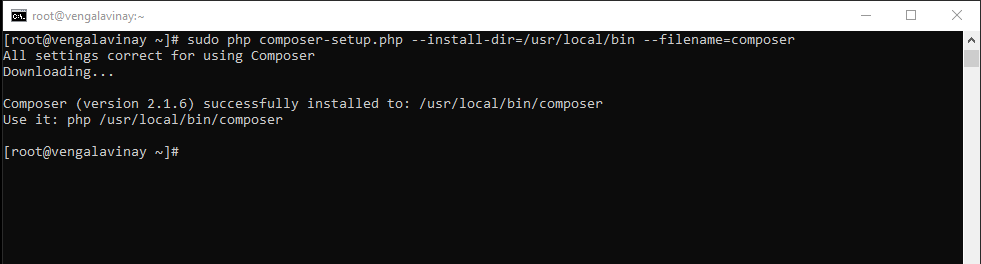
Verify the installation
composer
![]()
Step : 3 – Installing the docker Community Edition
Setup the docker repository by using yum-utilis (which provides the yum-config-manager) and setup the stable repository
sudo yum install -y yum-utils && yum-config-manager \
    --add-repo \
    https://download.docker.com/linux/centos/docker-ce.repo

Install the docker-ce
sudo yum install docker-ce docker-ce-cli containerd.io

Start the service
sudo systemctl start docker

Step : 4 – Create a magento project using the composer (open source or magento commerce)
Create / Login account in the Magento marketplace and go to the access key
Create a new Composer project using the Magento Open Source or Adobe Commerce metapackage.
composer create-project --repository-url=https://repo.magento.com/ magento/project-community-edition <magento-community>

5 – Installing the docker-compose
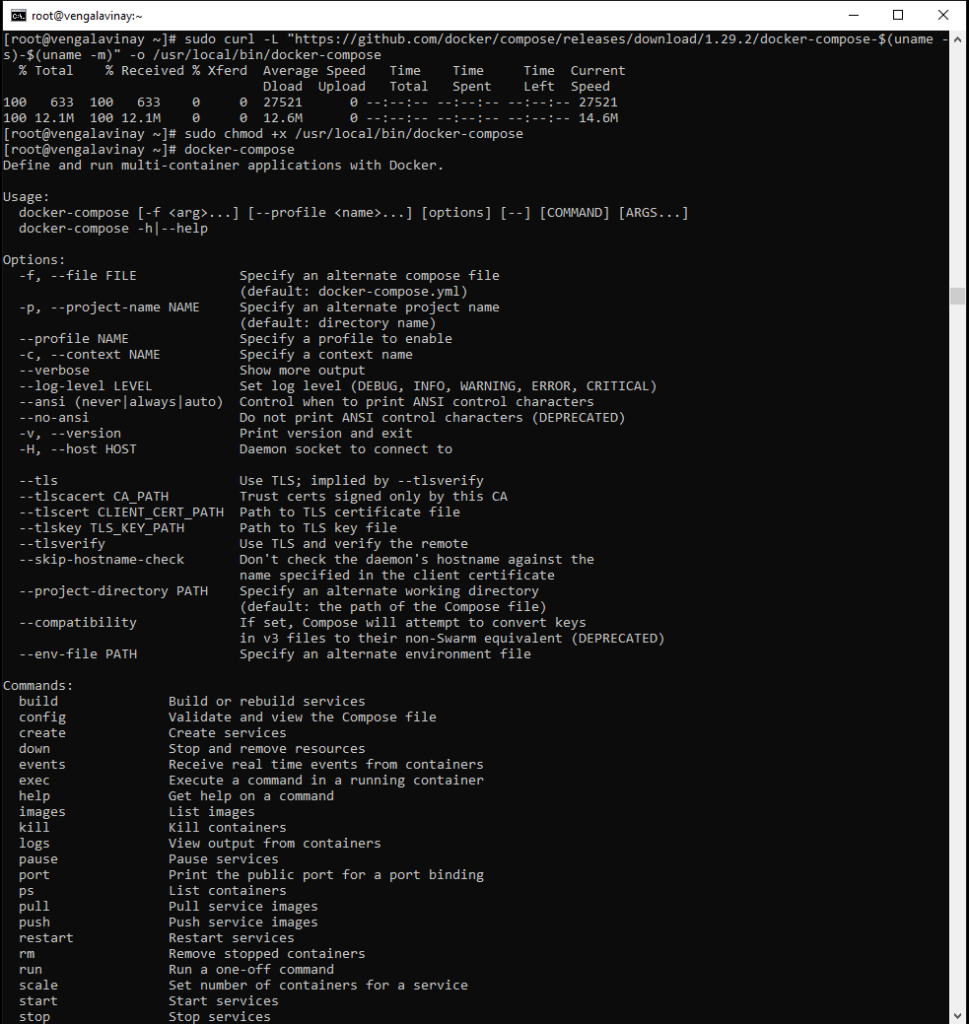
Run this command to download the current stable release of Docker Compose:
sudo curl -L "https://github.com/docker/compose/releases/download/1.29.2/docker-compose-$(uname -s)-$(uname -m)" -o /usr/local/bin/docker-compose
Apply executable permissions to the binary:
sudo chmod +x /usr/local/bin/docker-compose
Step : 6 – Setting up the docker-compose.yml – PHP 7.4, MariaDB 10.2 , PhpMyAdmin and Elastic search
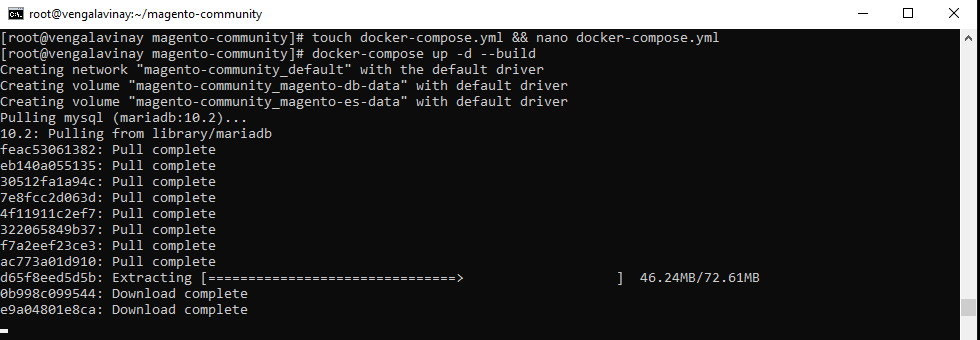
create a docker-compose-yml and copy the contents into it.
touch docker-compose.yml && nano docker-compose.yml
docker-compose.yml – replace commerce.vengalavinay.com with your domain name and replace the /root/magento-community with your Magento source path.
version: '3'
services:
    web:
        image: webdevops/php-apache-dev:7.4
        container_name: web
        restart: always
        user: application
        environment:
          - WEB_ALIAS_DOMAIN=commerce.vengalavinay.com
          - WEB_DOCUMENT_ROOT=/app/pub
          - PHP_DATE_TIMEZONE=EST
          - PHP_DISPLAY_ERRORS=1
          - PHP_MEMORY_LIMIT=2048M
          - PHP_MAX_EXECUTION_TIME=300
          - PHP_POST_MAX_SIZE=500M
          - PHP_UPLOAD_MAX_FILESIZE=1024M
        volumes:
          - /root/magento-community:/app:cached
        ports:
          - "80:80"
          - "443:443"
          - "32823:22"
        links:
          - mysql
    mysql:
        image: mariadb:10.2
        container_name: mysql
        restart: always
        ports:
          - "3306:3306"
        environment:
          - MYSQL_ROOT_PASSWORD=root
          - MYSQL_DATABASE=magento
        volumes:
          - magento-db-data:/var/lib/mysql
    phpmyadmin:
        container_name: phpmyadmin
        restart: always
        image: phpmyadmin/phpmyadmin:latest
        environment:
          - MYSQL_ROOT_PASSWORD=root
          - PMA_USER=root
          - PMA_PASSWORD=root
        ports:
          - "8080:80"
        links:
          - mysql:db
        depends_on:
          - mysql
    elasticsearch:
        container_name: elasticsearch
        image: docker.elastic.co/elasticsearch/elasticsearch:7.8.1
        environment:
          - node.name=elasticsearch
          - cluster.name=es-docker-cluster
          - discovery.type=single-node
          - bootstrap.memory_lock=true
          - "ES_JAVA_OPTS=-Xms512m -Xmx512m"
        ulimits:
          memlock:
            soft: -1
            hard: -1
        volumes:
          - magento-es-data:/usr/share/elasticsearch/data
        ports:
          - 9200:9200
volumes:
    magento-db-data:
        external: false
    magento-es-data:
        external: false
Step : 7 – Running the docker build
Run the below command to build the docker containers.
docker-compose up -d --build
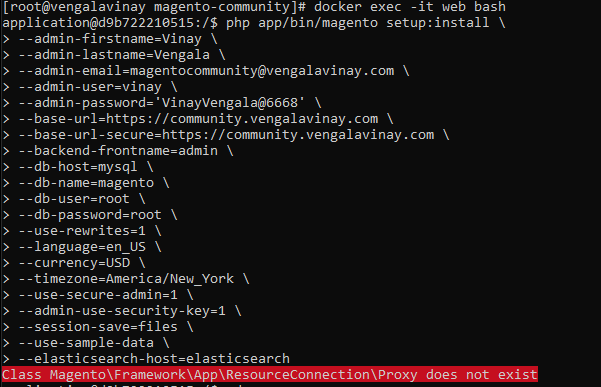
access the web container by using the below command
docker exec -it web bash

Step : 8 – Magento Installation Setup using the Command line
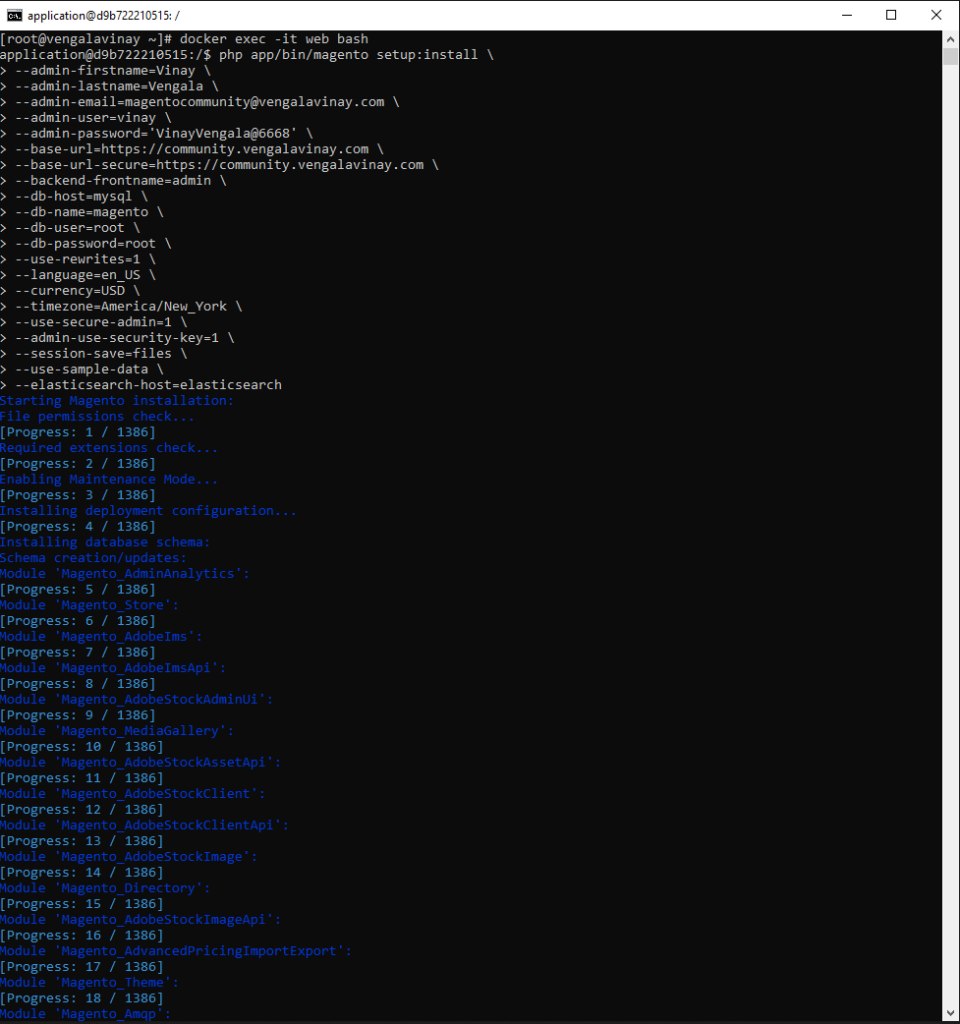
After acess the web container. run the below command in the web container. Change the basic details(firstname, lastname, email, user, and password) and finally change the domain name.
php app/bin/magento setup:install \
--admin-firstname=Vinay \
--admin-lastname=Vengala \
[email protected] \
--admin-user=vinay \
--admin-password='VinayVengala@6668' \
--base-url=https://community.vengalavinay.com \
--base-url-secure=https://community.vengalavinay.com \
--backend-frontname=admin \
--db-host=mysql \
--db-name=magento \
--db-user=root \
--db-password=root \
--use-rewrites=1 \
--language=en_US \
--currency=USD \
--timezone=America/New_York \
--use-secure-admin=1 \
--admin-use-security-key=1 \
--session-save=files \
--use-sample-data \
--elasticsearch-host=elasticsearch
if you see the below error when you are installing the magento.
Class Magento\Framework\App\ResourceConnection\Proxy does not exist
exit from the docker web container and change the permission to the folder
chmod 777 -R <magento-community/>
After successful installation.
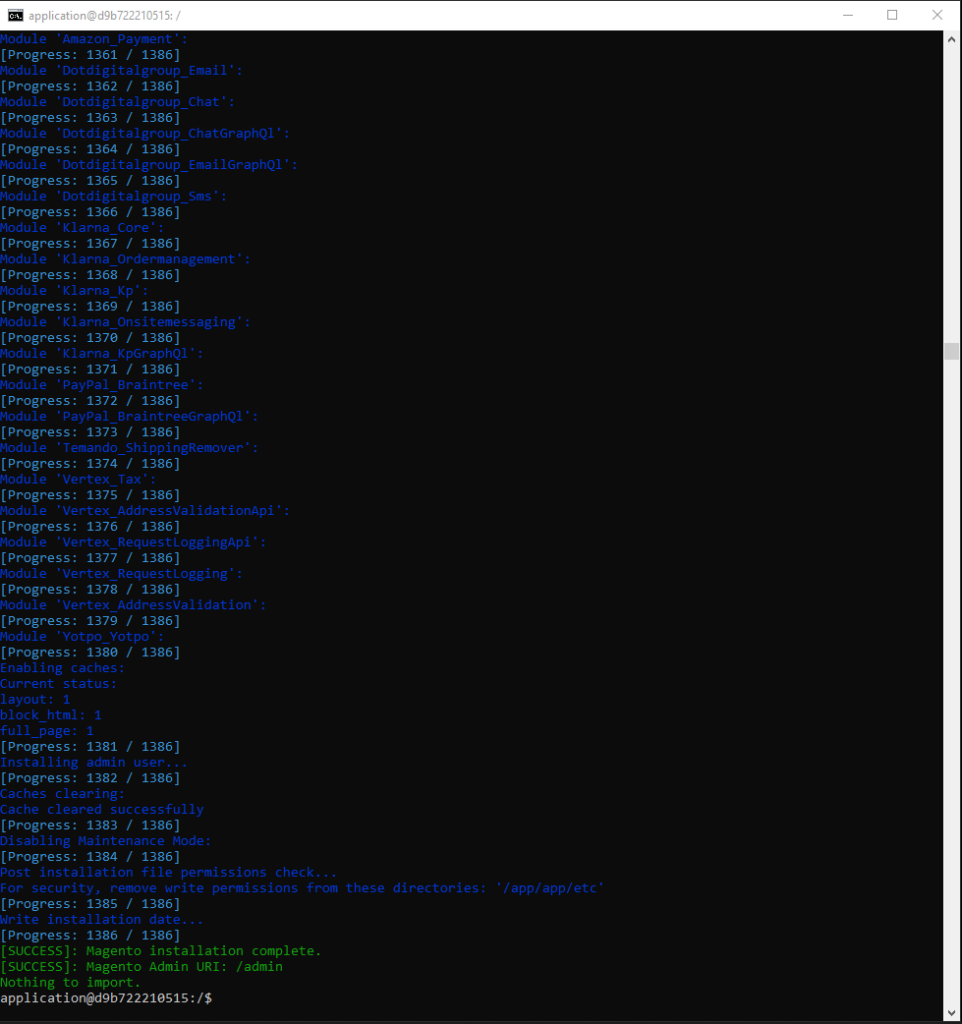
Point the IP address to the domain. using A record in DNS settings.
Leave a Reply
You must be logged in to post a comment.